How to Access Linksys Velop in Bridge Mode? A Detailed Guide!
The Linksys Velop bridge mode enables users to experience the benefits of secure wifi networks with better coverage and signal strength. Additionally, it ensures that all the Linksys Velop nodes are connected and work as a single network, facilitating seamless communication with the unified network.
However, Velop bridge mode is needed to increase the network coverage and enhance internet performance as a single network. Thus, we provide you with complete details on why and how to put the Velop in bridge mode. Just read this guide!
What are the Requirements for Enabling Linksys Velop Bridge Mode?
To put the Linksys Velop wifi systems on the bridge mode, you need to have the following things with you:

Linksys Velop Router

Stable Internet Connection

Default Web/IP Addresses

The Admin Credentials

Installed Linksys App

Computer/Laptop or Smartphone
How to Put Linksys Velop in Bridge Mode?
Primarily, the motive for putting the Velop bridge mode is to ensure the seamless connectivity of all the networking devices through the single modem & connected nodes. Generally, there are two methods to enable the Linksys Velop bridge mode, which is using the web GUI and through the app.
In this section, we present steps of these methods to carry out this process smoothly. So, read the steps below:
Web GUI Method to Setup Bridge Mode Linksys
- Firstly, power on the parent node on the Linksys Velop.
- Then, connect your laptop/computer to the Velop node network.
- Instead, you can use the ethernet cable connection or directly connect the Velop node to the WiFi.
- Further, open your web browser and enter “linksyssmartwifi.com” web or 192.168.1.1 IP address.
- The Velop login window appears to you now, enter your admin credentials in the required fields.
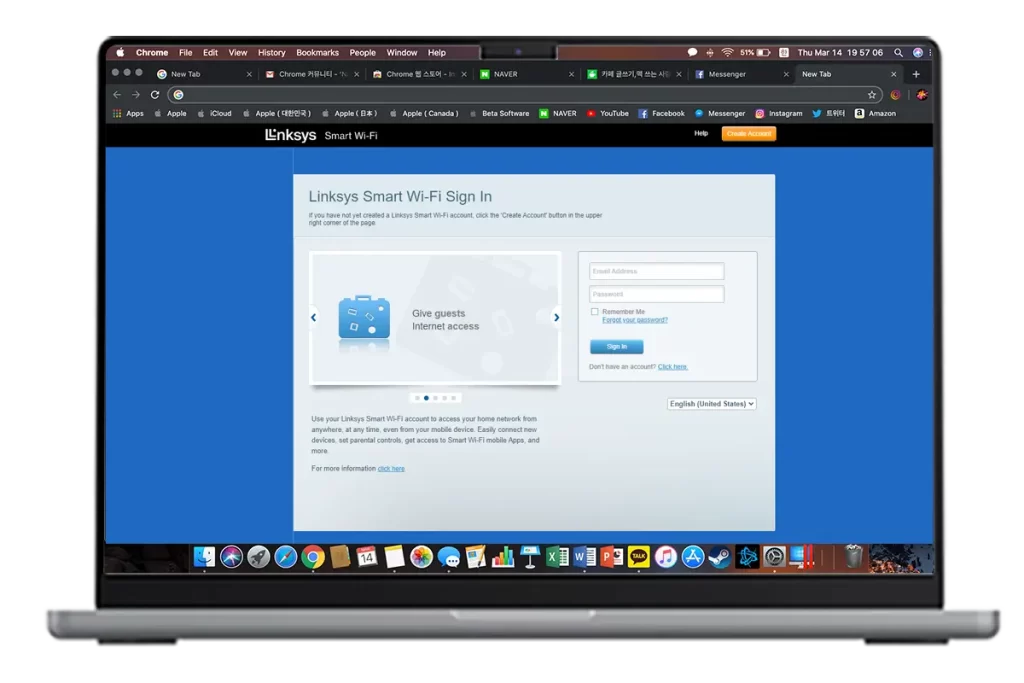
- After that, navigate the smart Setup wizard of the Velop.
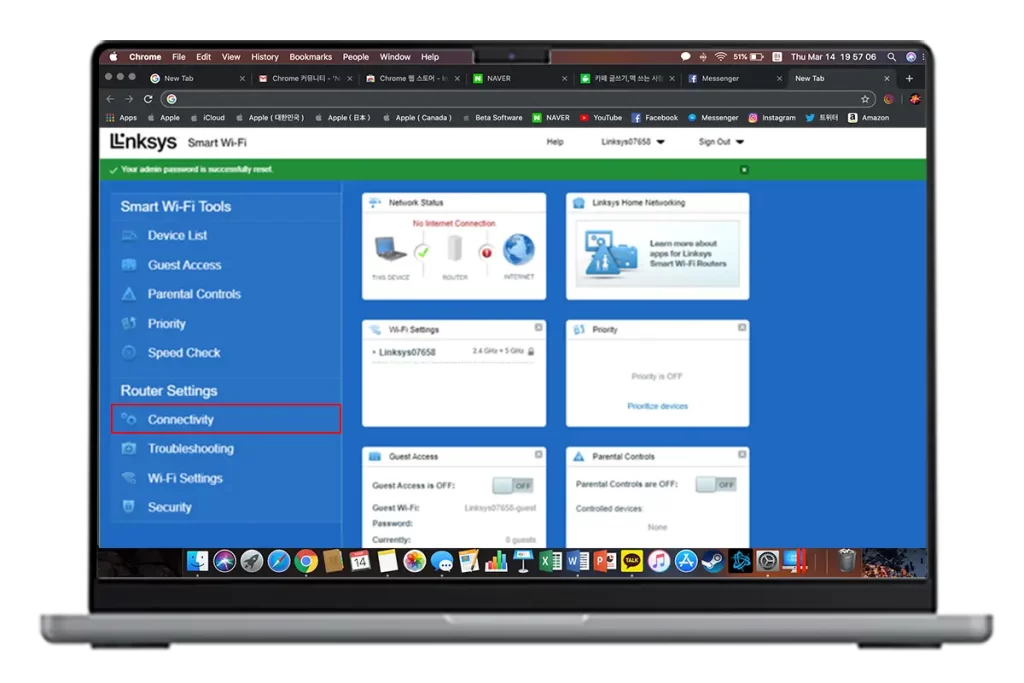
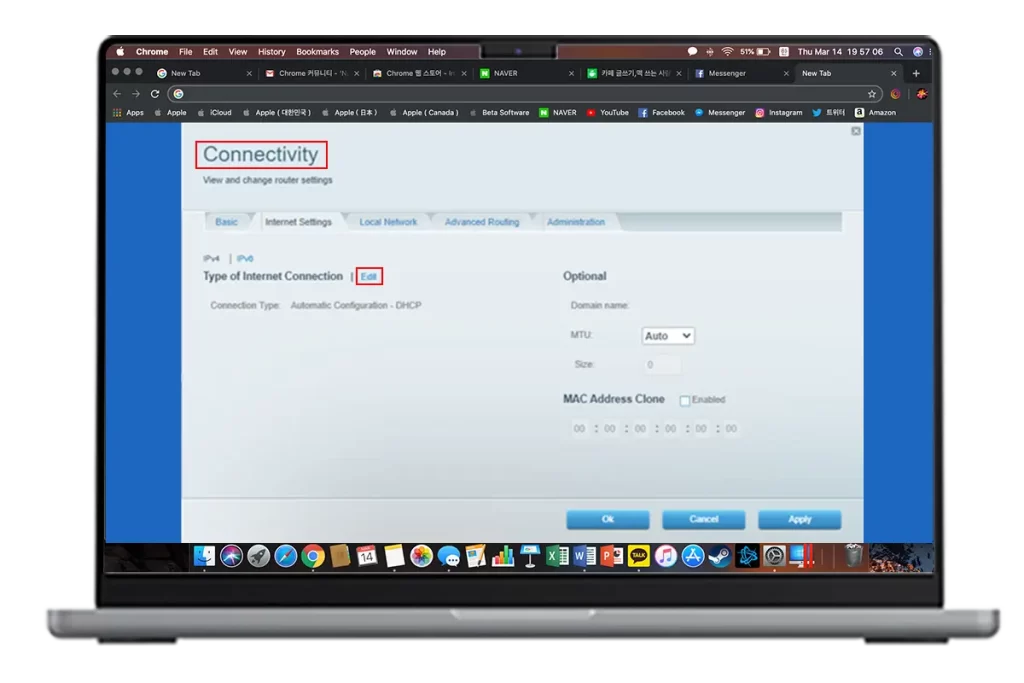
- Further, click on the Router Settings>Connectivity>Internet Settings>Edit.
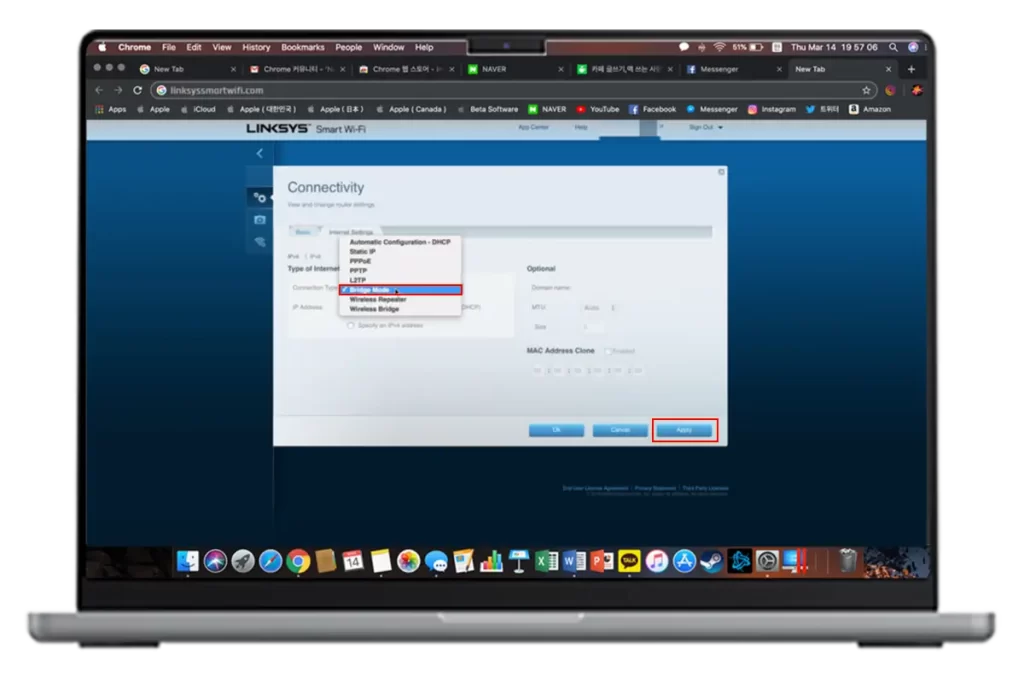
- Thereafter, you need to select the Connection Type as Bridge Mode.
- Set the IP configuration for your router or use the DHCP automatic IP generator feature.
- Lastly, click on Apply> OK to save and execute these changes.
- Here, the Warning screen prompts you to tap on Yes> OK.
- Finally, this completes the Velop bridge mode setup process.
Putting the Velop in Bridge Mode Through the Linksys App
- To begin with, turn on the Velop node.
- Now, ensure that you have downloaded the latest version of the Linksys app.
- If yes, then launch and run the app, otherwise update it first.
- Further, sign in to your Velop account or create a new account.
- After successfully accessing your account, select the Menu option.
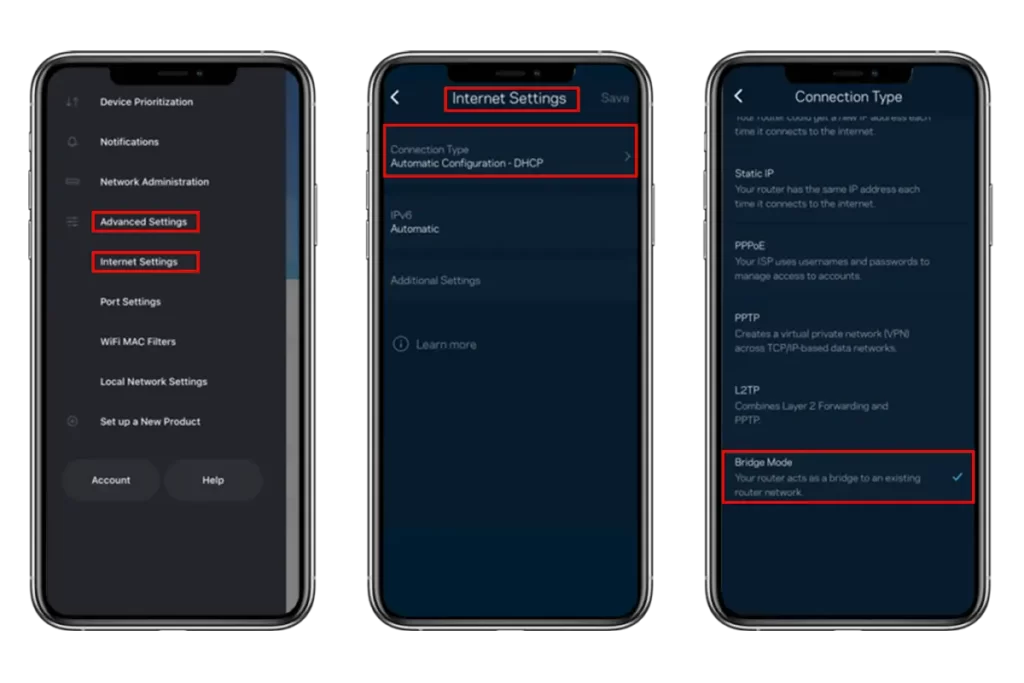
- Thereafter, visit the Advanced Settings>Internet Settings.
- Afterward, select the Connection Type and then choose the Bridge Mode.
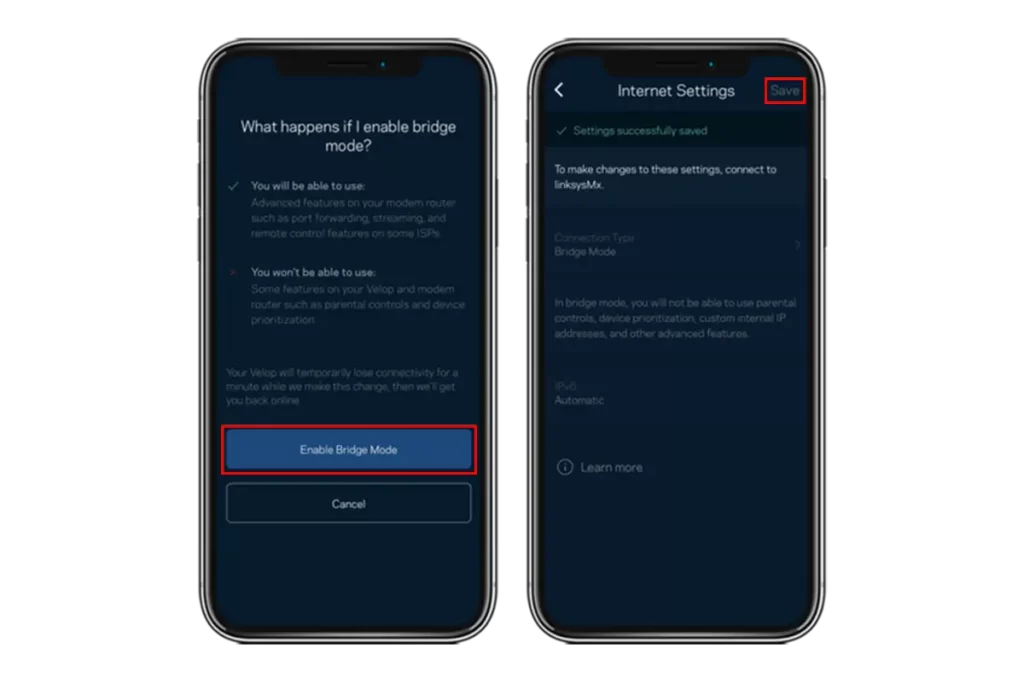
- Tap on Save>Enable the bridge mode.
- At last, implement the recent changes and you will be notified when your router operates at the bridge mode.
Not able to Set Up Velop Bridge Mode? Try These Fixes!
Users often complain about the Velop bridge mode not working appropriately, resulting in several issues. Primarily, it is caused due to improper configuration, unstable network, network cable issues, outdated firmware, device compatibility issues, etc. To resolve these issues, try out the given fixes:
- To fix the technical glitches and bugs, try power cycling/rebooting the router.
- Additionally, check your network cable connections and cable conditions.
- Make sure you are using the updated version of the Linksys app.
- Fix the web browser issues by removing the unnecessary cache & cookies.
- Eliminate the network interferences to ensure good signal strength.
- Cross-verify that your Velop parent node is connected appropriately to the modem.
- Make sure your Velop mesh system has an updated version of the firmware.
- If issues are still there, hard reset the Linksys Velop and reconfigure it again.
Final Thoughts
In conclusion, through this brief guide, you are now well aware of the Linksys Velop bridge mode setup process. Additionally, this guide illustrates the simple steps to configure your Linksys Velop on the Bridge Mode using the app and web GUI. Alongside this, a simple troubleshooting guide is also added here to assist the users if they face any issues during this process. To learn more, contact us!
FAQs
How to Change Linksys Velop from Bridge Mode?
To change the Linksys Velop from the bridge mode, you need to visit Settings>Advanced Settings and then disable the bridge mode.
Why is Linksys Velop Blinking Red Light in Bridge Mode?
The blinking red light on the Linksys Velop indicates that the Velop node is not connected to the primary router. Outdated or corrupted firmware could also be a reason for blinking red light.
Can I Setup Guest Control in Bridge Mode?
Yes, you can set up guest control in the bridge mode, but it requires specific hardware support and configuration.
How to Reset Linksys Velop in Bridge Mode?
The Reset button is the simplest method to reset Velop in the bridge mode. To proceed with this, press and hold the reset button on your device for a few seconds and release it till the LED blinks and the device reboots itself.

Hi there, its nice article on the topic of media print, we all be familiar with media is a
wonderful source of data.
Review my web-site … ตลาดคริปโตวันนี้
buy zithromax 250mg online – azithromycin 500mg oral nebivolol 5mg pill
The Best Premium IPTV Service WorldWide!
buy prednisolone 20mg online cheap – omnacortil 40mg for sale order prometrium 200mg sale
Wow! This could be one particular of the most helpful blogs We’ve ever arrive across on this subject. Basically Wonderful. I am also an expert in this topic so I can understand your effort.
neurontin buy online – purchase anafranil for sale where to buy sporanox without a prescription
furosemide medication – purchase piracetam generic buy betnovate 20gm online
I have learn some just right stuff here. Certainly price bookmarking for revisiting. I wonder how much attempt you place to create this sort of excellent informative website.
Good write-up, I’m normal visitor of one’s blog, maintain up the excellent operate, and It’s going to be a regular visitor for a lengthy time.
order monodox for sale – buy vibra-tabs generic glipizide 10mg oral
buy augmentin 375mg without prescription – order amoxiclav generic buy cymbalta 40mg online
It is really a great and useful piece of information. I’m glad that you just shared this useful information with us. Please keep us up to date like this. Thanks for sharing.
z122g6
I got what you mean , appreciate it for putting up.Woh I am lucky to find this website through google. “If one does not know to which port one is sailing, no wind is favorable.” by Seneca.
vomwh9
cheap augmentin 1000mg – buy nizoral for sale brand duloxetine 40mg
ubz5vg
rybelsus 14 mg over the counter – levitra 20mg brand buy periactin generic
viagra for men – viagra 50mg over the counter cialis savings card
Hello there, You have done an incredible job. I will certainly digg it and personally recommend to my friends. I’m confident they’ll be benefited from this site.
https://www.zoritolerimol.com
Hey there just wanted to give you a quick heads up and let you know a few of the images aren’t loading correctly. I’m not sure why but I think its a linking issue. I’ve tried it in two different internet browsers and both show the same outcome.
https://airportgloballimo.com/
Enjoyed studying this, very good stuff, thanks. “Whenever you want to marry someone, go have lunch with his ex-wife.” by Francis William Bourdillon.
https://exdest.com/costa-rica-tours/
You actually make it seem so easy with your presentation but I find this matter to be actually something which I think I would never understand. It seems too complex and very broad for me. I am looking forward for your next post, I will try to get the hang of it!
https://exdest.com/galapagos-luxury-charters/
Very efficiently written story. It will be beneficial to anybody who utilizes it, as well as me. Keep up the good work – looking forward to more posts.
https://lafayette-process-servers.com/
I’m not sure why but this website is loading extremely slow for me. Is anyone else having this issue or is it a problem on my end? I’ll check back later on and see if the problem still exists.
https://same-day-courier-lafayette.com/
I carry on listening to the news speak about receiving boundless online grant applications so I have been looking around for the finest site to get one. Could you tell me please, where could i find some?
https://downloadblueprints.com/
Hello.This post was really remarkable, particularly because I was looking for thoughts on this matter last Monday.
https://downloadblueprints.com/
dOL fMLpj ZeRryqeJ OtWoit nTSIKTD rARiXY GcBg
buy cenforce generic – cenforce 50mg generic order glycomet sale
rhpwca
Lovely just what I was looking for.Thanks to the author for taking his time on this one.
http://www.vorbelutrioperbir.com
hzck6s
Valuable info. Lucky me I found your website by accident, and I am shocked why this accident did not happened earlier! I bookmarked it.
https://www.mydogsupplystore.com
buy prilosec 20mg online cheap – brand omeprazole oral tenormin 100mg
I have learn some just right stuff here. Certainly value bookmarking for revisiting. I surprise how a lot attempt you put to make such a wonderful informative web site.
https://www.elitesportsmedals.co.uk/cycle-medals/
There’s noticeably a bundle to learn about this. I assume you made sure nice factors in options also.
https://www.elitesportsmedals.co.uk/football-tournament/
medrol 8mg otc – methylprednisolone 8 mg tablets buy aristocort generic
1q9enp
buy misoprostol 200mcg – buy xenical 120mg without prescription buy diltiazem 180mg online cheap
I must get across my love for your kind-heartedness supporting people that actually need guidance on this particular concern. Your personal dedication to getting the solution all around appeared to be quite beneficial and has truly empowered professionals like me to attain their endeavors. Your invaluable help and advice implies so much to me and further more to my mates. Best wishes; from each one of us.
https://dunnung.com
Thanks a lot for sharing this with all of us you really know what you’re talking about! Bookmarked. Please also visit my site =). We could have a link exchange contract between us!
https://www.droversointeru.com
acyclovir 400mg for sale – zyloprim 300mg pill rosuvastatin 20mg drug
Hi my loved one! I want to say that this post is awesome, great written and include approximately all important infos. I’d like to see extra posts like this.
https://www.zoritolerimol.com
motilium pill – motilium where to buy order cyclobenzaprine for sale
I would like to thnkx for the efforts you have put in writing this blog. I am hoping the same high-grade blog post from you in the upcoming as well. In fact your creative writing abilities has inspired me to get my own blog now. Really the blogging is spreading its wings quickly. Your write up is a good example of it.
https://www.droversointeru.com
fantastic points altogether, you just gained a new reader. What would you suggest about your post that you made a few days ago? Any positive?
http://www.tlovertonet.com/
tsskp7
order domperidone 10mg pills – sumycin pills buy cyclobenzaprine pills
http://terios2.ru/forums/index.php?autocom=gallery&req=si&img=4545
order inderal 10mg online cheap – methotrexate pill methotrexate 10mg over the counter
https://honda-fit.ru/forums/index.php?autocom=gallery&req=si&img=7271
http://toyota-porte.ru/forums/index.php?autocom=gallery&req=si&img=3371
warfarin pills – purchase cozaar without prescription order cozaar pills
https://hrv-club.ru/forums/index.php?autocom=gallery&req=si&img=7176
esomeprazole 40mg pills – order topiramate 100mg generic imitrex pills
My brother recommended I would possibly like this website. He used to be totally right. This post truly made my day. You cann’t consider simply how much time I had spent for this info! Thanks!
https://lestergrow.es/convierte-tu-chatbot-en-la-herramienta-clave-de-marketing-en-whatsapp/
kamagra livraison 24h: Kamagra Oral Jelly pas cher – kamagra oral jelly
Wow! After all I got a weblog from where I know how to actually get valuable facts concerning my study and knowledge.
Kamagra Oral Jelly pas cher Kamagra Oral Jelly pas cher kamagra oral jelly
Pharmacie en ligne livraison Europe: Medicaments en ligne livres en 24h – pharmacie en ligne france fiable pharmafst.com
Cialis sans ordonnance 24h: cialis sans ordonnance – Pharmacie en ligne Cialis sans ordonnance tadalmed.shop
Acheter Kamagra site fiable: kamagra livraison 24h – Kamagra pharmacie en ligne
https://pharmafst.com/# trouver un mГ©dicament en pharmacie
kamagra pas cher: Kamagra pharmacie en ligne – kamagra gel
Achat mГ©dicament en ligne fiable Meilleure pharmacie en ligne pharmacie en ligne sans ordonnance pharmafst.shop
pharmacie en ligne france pas cher: pharmacie en ligne pas cher – trouver un mГ©dicament en pharmacie pharmafst.com
Cialis sans ordonnance pas cher: cialis sans ordonnance – Cialis generique prix tadalmed.shop
http://tadalmed.com/# Cialis sans ordonnance pas cher
Achat mГ©dicament en ligne fiable: Medicaments en ligne livres en 24h – vente de mГ©dicament en ligne pharmafst.com
cialis generique Tadalafil achat en ligne Acheter Cialis 20 mg pas cher tadalmed.com
cialis sans ordonnance: cialis generique – Pharmacie en ligne Cialis sans ordonnance tadalmed.shop
Achat mГ©dicament en ligne fiable: pharmacie en ligne sans ordonnance – acheter mГ©dicament en ligne sans ordonnance pharmafst.com
http://pharmafst.com/# trouver un mГ©dicament en pharmacie
vente de mГ©dicament en ligne: Medicaments en ligne livres en 24h – п»їpharmacie en ligne france pharmafst.com
pharmacie en ligne livraison europe: Medicaments en ligne livres en 24h – acheter mГ©dicament en ligne sans ordonnance pharmafst.com
kamagra gel Kamagra pharmacie en ligne kamagra gel
pharmacie en ligne avec ordonnance: Livraison rapide – Achat mГ©dicament en ligne fiable pharmafst.com
http://tadalmed.com/# Cialis generique prix
Acheter Kamagra site fiable: Kamagra pharmacie en ligne – kamagra 100mg prix
kamagra gel: kamagra livraison 24h – Kamagra pharmacie en ligne
pharmacies en ligne certifiГ©es acheter mГ©dicament en ligne sans ordonnance Pharmacie Internationale en ligne pharmafst.shop
Kamagra Commander maintenant: kamagra oral jelly – kamagra oral jelly
http://kamagraprix.com/# kamagra en ligne
Cialis generique prix: Tadalafil achat en ligne – Acheter Cialis 20 mg pas cher tadalmed.shop
Kamagra Commander maintenant: kamagra oral jelly – kamagra livraison 24h
pharmacie en ligne france pas cher pharmacie en ligne pas cher trouver un mГ©dicament en pharmacie pharmafst.shop
https://tadalmed.shop/# Pharmacie en ligne Cialis sans ordonnance
Pharmacie en ligne Cialis sans ordonnance: Cialis sans ordonnance pas cher – Cialis en ligne tadalmed.shop
pharmacie en ligne france pas cher: pharmacie en ligne – pharmacie en ligne fiable pharmafst.com
kamagra livraison 24h kamagra 100mg prix Achetez vos kamagra medicaments
https://kamagraprix.com/# Kamagra Oral Jelly pas cher
Pharmacie en ligne Cialis sans ordonnance: Achat Cialis en ligne fiable – Cialis sans ordonnance 24h tadalmed.shop
Cialis sans ordonnance 24h: Cialis generique prix – Acheter Cialis 20 mg pas cher tadalmed.shop
https://vitz.ru/forums/index.php?autocom=gallery&req=si&img=4920
http://terios2.ru/forums/index.php?autocom=gallery&req=si&img=4661
Kamagra Oral Jelly pas cher: Kamagra Commander maintenant – kamagra gel
Acheter Cialis 20 mg pas cher Tadalafil 20 mg prix en pharmacie Pharmacie en ligne Cialis sans ordonnance tadalmed.com
https://kamagraprix.shop/# Kamagra Commander maintenant
Achetez vos kamagra medicaments: acheter kamagra site fiable – Achetez vos kamagra medicaments
Cialis sans ordonnance 24h: Tadalafil sans ordonnance en ligne – Cialis en ligne tadalmed.shop
kamagra gel: kamagra gel – kamagra 100mg prix
https://pharmafst.shop/# Pharmacie sans ordonnance
Achetez vos kamagra medicaments: kamagra oral jelly – kamagra gel
https://tadalmed.shop/# cialis prix
Pharmacie en ligne Cialis sans ordonnance: Pharmacie en ligne Cialis sans ordonnance – cialis prix tadalmed.shop
https://kamagraprix.com/# Kamagra pharmacie en ligne
kamagra livraison 24h: acheter kamagra site fiable – achat kamagra
https://kamagraprix.com/# Kamagra Commander maintenant
Achat Cialis en ligne fiable: Tadalafil 20 mg prix en pharmacie – Acheter Viagra Cialis sans ordonnance tadalmed.shop
canadian pharmacy antibiotics: Canadian pharmacy shipping to USA – canadian pharmacy meds
the canadian pharmacy Generic drugs from Canada reliable canadian pharmacy reviews
https://medicinefromindia.com/# Medicine From India
prescription drugs canada buy online: Express Rx Canada – recommended canadian pharmacies
medicine courier from India to USA: mail order pharmacy india – medicine courier from India to USA
indian pharmacy: indian pharmacy online – Medicine From India
https://rxexpressmexico.shop/# Rx Express Mexico
mexico pharmacy order online RxExpressMexico mexican rx online
Rx Express Mexico: mexican online pharmacy – mexican rx online
Medicine From India: Medicine From India – MedicineFromIndia
safe canadian pharmacy: ordering drugs from canada – canadian online pharmacy reviews
https://expressrxcanada.com/# canadian pharmacy india
canadian pharmacy online: canada pharmacy online – cross border pharmacy canada
Rx Express Mexico: mexican online pharmacy – mexican online pharmacy
medicine courier from India to USA indian pharmacy online buy prescription drugs from india
mexico pharmacy order online: mexico pharmacies prescription drugs – RxExpressMexico
reddit canadian pharmacy: Generic drugs from Canada – canadian pharmacy ltd
order mobic 7.5mg generic – mobic drug tamsulosin 0.4mg uk
MedicineFromIndia: medicine courier from India to USA – medicine courier from India to USA
Rx Express Mexico mexico pharmacies prescription drugs RxExpressMexico
Medicine From India: indian pharmacy – top online pharmacy india
Rx Express Mexico: mexico pharmacies prescription drugs – mexican online pharmacy
https://expressrxcanada.shop/# canadian pharmacy ed medications
RxExpressMexico: mexican rx online – Rx Express Mexico
medicine courier from India to USA: indian pharmacy online – indian pharmacy online shopping
indian pharmacy online shopping MedicineFromIndia MedicineFromIndia
mexico pharmacy order online: mexico pharmacy order online – mexico pharmacy order online
https://expressrxcanada.com/# precription drugs from canada
mexico pharmacy order online: mexican rx online – RxExpressMexico
Rx Express Mexico: mexican rx online – mexico drug stores pharmacies
indian pharmacy online: Medicine From India – indian pharmacy online shopping
canada pharmacy online Express Rx Canada canadian pharmacy no rx needed
https://expressrxcanada.shop/# my canadian pharmacy reviews
Rx Express Mexico: mexico drug stores pharmacies – mexico pharmacy order online
RxExpressMexico: mexico pharmacies prescription drugs – mexico drug stores pharmacies
Rx Express Mexico Rx Express Mexico mexican online pharmacy
https://medicinefromindia.com/# MedicineFromIndia
mexico drug stores pharmacies: Rx Express Mexico – mexican online pharmacy
пин ап вход: пин ап казино официальный сайт – пин ап казино
https://vavadavhod.tech/# vavada
vavada вавада зеркало vavada вход
пин ап казино официальный сайт: пин ап зеркало – пин ап вход
vavada: вавада официальный сайт – vavada casino
пин ап зеркало: пин ап казино официальный сайт – пин ап зеркало
pin up вход: пин ап зеркало – пинап казино
http://vavadavhod.tech/# вавада казино
pin-up pin up az pin up
вавада: вавада официальный сайт – vavada вход
пин ап казино: пин ап зеркало – пин ап казино официальный сайт
https://pinuprus.pro/# пин ап зеркало
vavada vavada вход vavada casino
pin-up: pin up azerbaycan – pin up
пин ап вход: пин ап вход – пин ап зеркало
https://pinuprus.pro/# пин ап казино
pin up вход pin up вход пинап казино
pin-up casino giris: pin-up casino giris – pin-up casino giris
vavada вход: вавада зеркало – вавада
http://pinupaz.top/# pin up az
пин ап казино: пин ап зеркало – пинап казино
pinup az: pin up az – pin up casino
vavada casino вавада зеркало вавада
https://pinupaz.top/# pin up
pin-up casino giris: pin up casino – pin up az
vavada: vavada вход – vavada вход
vavada casino: vavada вход – vavada вход
пинап казино пин ап казино пин ап вход
http://pinupaz.top/# pin up
vavada: vavada вход – вавада официальный сайт
pin up azerbaycan: pin up casino – pin-up
пин ап вход: pin up вход – пин ап зеркало
пин ап зеркало пин ап казино пин ап казино официальный сайт
https://pinuprus.pro/# пин ап казино официальный сайт
pin up casino: pin up azerbaycan – pin-up
http://vavadavhod.tech/# вавада официальный сайт
pin-up casino giris pin-up pin-up casino giris
vavada casino: vavada – vavada вход
вавада: вавада – вавада казино
pinup az: pin-up – pinup az
http://pinuprus.pro/# пинап казино
пин ап казино: pin up вход – пин ап казино официальный сайт
pin up: pin-up – pinup az
http://pinupaz.top/# pin-up
pin up вход: пинап казино – пин ап зеркало
vavada casino вавада казино vavada casino
вавада зеркало: вавада официальный сайт – vavada
vavada casino: вавада казино – vavada
пинап казино: пин ап вход – pin up вход
pinup az: pin up – pin-up
http://pinupaz.top/# pin up azerbaycan
vavada casino: vavada casino – вавада казино
пин ап казино: пин ап вход – пин ап зеркало
https://honda-fit.ru/forums/index.php?autocom=gallery&req=si&img=7055
пинап казино пин ап казино пин ап вход
http://pinuprus.pro/# пин ап зеркало
вавада: vavada casino – вавада официальный сайт
pinup az: pin-up casino giris – pin up
вавада казино вавада официальный сайт вавада
vavada: вавада зеркало – вавада казино
pin-up: pin up – pin-up
pin up вход пин ап зеркало pin up вход
https://pinupaz.top/# pin up
vavada casino: вавада казино – vavada casino
pin-up: pin-up – pin up
вавада казино вавада зеркало вавада
https://pinupaz.top/# pin up az
vavada casino: вавада – vavada
pin-up casino giris: pin-up – pinup az
пин ап казино пин ап зеркало пин ап казино
https://pinupaz.top/# pin up
pin-up: pin-up – pinup az
пин ап зеркало: пин ап казино – pin up вход
http://pinuprus.pro/# пин ап зеркало
пин ап казино pin up вход пинап казино
вавада: вавада зеркало – вавада официальный сайт
пин ап казино: пин ап казино – пин ап вход
http://vavadavhod.tech/# вавада казино
пинап казино пинап казино пин ап казино
пин ап казино: пин ап казино официальный сайт – пин ап казино
pinup az: pinup az – pinup az
http://pinupaz.top/# pin-up
pin up вход: пин ап вход – пинап казино
вавада зеркало vavada vavada casino
вавада официальный сайт: вавада официальный сайт – vavada
pin up casino: pin-up casino giris – pin up az
vavada вход vavada вход vavada casino
https://vavadavhod.tech/# vavada casino
pin-up casino giris: pin up azerbaycan – pin up
pin up вход: пин ап вход – пин ап казино
вавада зеркало вавада казино vavada casino
https://pinuprus.pro/# пинап казино
vavada вход: vavada casino – vavada вход
vavada casino: вавада официальный сайт – vavada
пин ап казино пинап казино пин ап казино официальный сайт
http://pinuprus.pro/# пин ап казино официальный сайт
https://mazda-demio.ru/forums/index.php?autocom=gallery&req=si&img=6342
https://myteana.ru/forums/index.php?autocom=gallery&req=si&img=6631
pin up azerbaycan: pin-up – pin-up casino giris
pin-up casino giris pin-up pin-up
https://vavadavhod.tech/# вавада зеркало
pin up: pin up az – pin-up casino giris
pin-up: pin-up casino giris – pin up az
vavada vavada casino vavada casino
pin-up: pin-up – pin up azerbaycan
https://vavadavhod.tech/# vavada
vavada casino: вавада зеркало – вавада зеркало
вавада казино вавада казино vavada вход
пин ап зеркало: пин ап зеркало – пин ап казино официальный сайт
https://vavadavhod.tech/# vavada casino
https://honda-fit.ru/forums/index.php?autocom=gallery&req=si&img=7324
https://honda-fit.ru/forums/index.php?autocom=gallery&req=si&img=7340
Hey there! Do you use Twitter? I’d like to follow you if that would be ok. I’m absolutely enjoying your blog and look forward to new updates.
https://bravoevents-online.com
вавада казино: vavada casino – vavada вход
вавада: вавада официальный сайт – вавада казино
vavada вавада vavada casino
pin up az: pin-up – pin-up casino giris
vavada: vavada casino – вавада
вавада казино vavada casino вавада
вавада официальный сайт: vavada casino – вавада казино
пин ап вход: пин ап казино официальный сайт – пин ап вход
https://vavadavhod.tech/# vavada вход
вавада вавада вавада
pin up вход: пинап казино – пин ап казино
pin up az: pin up – pin-up casino giris
http://pinupaz.top/# pin up az
pin-up pin-up casino giris pin up casino
fcqxcf
vavada casino: вавада – вавада
пинап казино: пин ап казино – пин ап зеркало
http://pinupaz.top/# pin-up
пин ап казино официальный сайт пинап казино пин ап казино
пин ап казино: пин ап зеркало – пин ап вход
http://vavadavhod.tech/# вавада казино
вавада: вавада официальный сайт – vavada вход
https://pinuprus.pro/# pin up вход
vavada casino: vavada вход – вавада
вавада казино: вавада официальный сайт – вавада зеркало
вавада зеркало вавада казино vavada вход
http://pinuprus.pro/# пин ап вход
pin-up: pinup az – pin up casino
pin-up casino giris: pinup az – pin up az
pinup az pin-up pin up casino
https://pinupaz.top/# pin-up casino giris
вавада официальный сайт: vavada вход – вавада
vavada: вавада казино – вавада зеркало
pin-up casino giris pin-up pin up azerbaycan
пин ап казино: пин ап зеркало – пин ап казино
вавада казино: vavada casino – вавада зеркало
пин ап казино: пинап казино – пин ап зеркало
pinup az: pin up casino – pin-up
http://terios2.ru/forums/index.php?autocom=gallery&req=si&img=4714
https://hrv-club.ru/forums/index.php?autocom=gallery&req=si&img=7038
http://pinuprus.pro/# пинап казино
https://honda-fit.ru/forums/index.php?autocom=gallery&req=si&img=7222
trusted Viagra suppliers fast Viagra delivery best price for Viagra
order Viagra discreetly: buy generic Viagra online – buy generic Viagra online
https://maxviagramd.com/# generic sildenafil 100mg
modafinil 2025: safe modafinil purchase – Modafinil for sale
cheap Cialis online: affordable ED medication – best price Cialis tablets
buy modafinil online verified Modafinil vendors legal Modafinil purchase
https://modafinilmd.store/# verified Modafinil vendors
generic tadalafil: Cialis without prescription – generic tadalafil
modafinil pharmacy: doctor-reviewed advice – Modafinil for sale
legal Modafinil purchase modafinil pharmacy legal Modafinil purchase
ynvy68
secure checkout ED drugs: reliable online pharmacy Cialis – best price Cialis tablets
cheap Viagra online: same-day Viagra shipping – same-day Viagra shipping
https://modafinilmd.store/# modafinil pharmacy
secure checkout Viagra: order Viagra discreetly – order Viagra discreetly
buy modafinil online: Modafinil for sale – modafinil pharmacy
buy modafinil online: Modafinil for sale – safe modafinil purchase
Modafinil for sale modafinil pharmacy buy modafinil online
fast Viagra delivery: discreet shipping – same-day Viagra shipping
generic sildenafil 100mg: cheap Viagra online – fast Viagra delivery
best price for Viagra: no doctor visit required – fast Viagra delivery
https://modafinilmd.store/# verified Modafinil vendors
reliable online pharmacy Cialis Cialis without prescription generic tadalafil
same-day Viagra shipping: generic sildenafil 100mg – same-day Viagra shipping
Modafinil for sale: modafinil pharmacy – modafinil legality
reliable online pharmacy Cialis: generic tadalafil – generic tadalafil
discreet shipping ED pills online Cialis pharmacy online Cialis pharmacy
https://zipgenericmd.shop/# generic tadalafil
cheap Cialis online: online Cialis pharmacy – reliable online pharmacy Cialis
discreet shipping ED pills: FDA approved generic Cialis – cheap Cialis online
order Viagra discreetly: generic sildenafil 100mg – best price for Viagra
same-day Viagra shipping: buy generic Viagra online – best price for Viagra
https://modafinilmd.store/# legal Modafinil purchase
modafinil pharmacy: safe modafinil purchase – Modafinil for sale
cheap Cialis online: online Cialis pharmacy – Cialis without prescription
affordable ED medication: FDA approved generic Cialis – buy generic Cialis online
modafinil pharmacy modafinil legality doctor-reviewed advice
https://maxviagramd.com/# legit Viagra online
order Cialis online no prescription: Cialis without prescription – buy generic Cialis online
modafinil pharmacy: safe modafinil purchase – verified Modafinil vendors
modafinil 2025: legal Modafinil purchase – purchase Modafinil without prescription
best price Cialis tablets discreet shipping ED pills affordable ED medication
http://modafinilmd.store/# verified Modafinil vendors
legal Modafinil purchase: Modafinil for sale – legal Modafinil purchase
verified Modafinil vendors: modafinil pharmacy – purchase Modafinil without prescription
verified Modafinil vendors: modafinil pharmacy – modafinil 2025
purchase Modafinil without prescription: modafinil pharmacy – buy modafinil online
https://maxviagramd.com/# order Viagra discreetly
purchase Modafinil without prescription modafinil legality buy modafinil online
best price Cialis tablets: discreet shipping ED pills – online Cialis pharmacy
online Cialis pharmacy: cheap Cialis online – FDA approved generic Cialis
modafinil pharmacy: legal Modafinil purchase – safe modafinil purchase
http://maxviagramd.com/# buy generic Viagra online
generic tadalafil best price Cialis tablets order Cialis online no prescription
discreet shipping ED pills: Cialis without prescription – online Cialis pharmacy
order Cialis online no prescription: buy generic Cialis online – discreet shipping ED pills
legal Modafinil purchase: purchase Modafinil without prescription – buy modafinil online
https://modafinilmd.store/# doctor-reviewed advice
best price Cialis tablets: affordable ED medication – secure checkout ED drugs
Cialis without prescription best price Cialis tablets FDA approved generic Cialis
how can i get clomid price: Clom Health – cost generic clomid pill
can i buy generic clomid without insurance: get cheap clomid without insurance – where can i buy generic clomid
how to get amoxicillin over the counter Amo Health Care amoxicillin 500mg buy online canada
http://prednihealth.com/# prednisone 20mg buy online
prednisone 5 mg tablet: PredniHealth – PredniHealth
can you buy clomid without prescription: can you buy generic clomid pill – buy cheap clomid price
Amo Health Care: Amo Health Care – Amo Health Care
https://amohealthcare.store/# Amo Health Care
cost of clomid for sale buy clomid without rx can i buy cheap clomid for sale
Amo Health Care: amoxicillin 500 mg where to buy – Amo Health Care
cost of prednisone 10mg tablets: PredniHealth – PredniHealth
amoxicillin 500: Amo Health Care – prescription for amoxicillin
https://prednihealth.com/# PredniHealth
cost of clomid without insurance: can you buy clomid – where to get clomid no prescription
buy amoxicillin canada Amo Health Care amoxicillin from canada
PredniHealth: PredniHealth – prednisone no rx
PredniHealth: PredniHealth – prednisone 1mg purchase
https://amohealthcare.store/# amoxicillin 500 mg without a prescription
amoxicillin 500 coupon: amoxicillin without a doctors prescription – Amo Health Care
10mg prednisone daily generic prednisone online PredniHealth
buy amoxicillin 500mg online: amoxicillin in india – amoxicillin 500mg capsule cost
http://clomhealth.com/# can i order generic clomid without insurance
order amoxicillin no prescription Amo Health Care amoxicillin 500 mg cost
Amo Health Care: Amo Health Care – Amo Health Care
Amo Health Care: Amo Health Care – generic for amoxicillin
https://prednihealth.com/# pharmacy cost of prednisone
can i purchase cheap clomid prices Clom Health where to get cheap clomid without dr prescription
Amo Health Care: amoxicillin azithromycin – generic amoxicillin 500mg
how to buy amoxicillin online: Amo Health Care – Amo Health Care
https://prednihealth.shop/# 2.5 mg prednisone daily
Amo Health Care: Amo Health Care – buy amoxicillin online uk
amoxicillin 500mg capsules antibiotic amoxicillin 500 mg online how to buy amoxicillin online
buy prednisone 10mg online: prednisone 40 mg daily – PredniHealth
cialis patient assistance: Tadal Access – cialis vs flomax
https://tadalaccess.com/# cialis side effects forum
cialis 10 mg: cialis meme – buy cialis online canada
cialis where can i buy Tadal Access cialis soft tabs
cialis where can i buy: Tadal Access – best research tadalafil 2017
https://tadalaccess.com/# cialis generic timeline 2018
cialis images: Tadal Access – tadalafil tablets 20 mg reviews
cialis coupon free trial TadalAccess tadalafil generic reviews
buy cialis from canada: cialis vs sildenafil – tadalafil citrate research chemical
https://tadalaccess.com/# buy cialis shipment to russia
buy voucher for cialis daily online: cialis advertisement – tadalafil generic 20 mg ebay
brand cialis australia Tadal Access cialis for sale
best price for tadalafil: Tadal Access – cialis 20 mg best price
https://tadalaccess.com/# best place to get cialis without pesricption
cialis dapoxetine overnight shipment: generic cialis 5mg – best reviewed tadalafil site
buy cialis online free shipping Tadal Access cialis patent expiration 2016
cialis price comparison no prescription: Tadal Access – where to buy cialis soft tabs
https://tadalaccess.com/# cialis indications
canada cialis for sale: TadalAccess – cheap tadalafil 10mg
what is the generic for cialis: cialis for bph – when should you take cialis
https://tadalaccess.com/# cialis definition
cialis leg pain cialis for sale over the counter tadalafil generic in usa
side effects of cialis: blue sky peptide tadalafil review – online cialis prescription
tadalafil 40 mg with dapoxetine 60 mg: tadalafil citrate research chemical – cialis pills
https://tadalaccess.com/# cialis 5mg cost per pill
cialis tadalafil 20 mg Tadal Access tadalafil tablets erectafil 20
tadalafil cialis: how to get cialis prescription online – is tadalafil and cialis the same thing?
maxim peptide tadalafil citrate: tadalafil 40 mg with dapoxetine 60 mg – cialis no perscription overnight delivery
https://tadalaccess.com/# cialis pills online
When I originally commented I clicked the -Notify me when new comments are added- checkbox and now each time a comment is added I get four emails with the same comment. Is there any way you can remove me from that service? Thanks!
https://www.zoritolerimol.com
cialis stories cialis trial cialis for sale
generic cialis online pharmacy: no prescription tadalafil – cialis dapoxetine overnight shipment
cialis on sale: cialis generic cost – cialis generic for sale
https://tadalaccess.com/# cialis 20 mg coupon
cialis paypal canada do you need a prescription for cialis order generic cialis online 20 mg 20 pills
how to get cialis prescription online: TadalAccess – buy tadalafil online paypal
cialis with dapoxetine 60mg: cialis australia online shopping – cialis price canada
https://tadalaccess.com/# tadalafil tamsulosin combination
zofran online – order zofran 8mg online simvastatin sale
cialis 80 mg dosage what does cialis look like best place to buy liquid tadalafil
how long does it take for cialis to start working: tadalafil citrate bodybuilding – cialis professional ingredients
cialis using paypal in australia: TadalAccess – cialis dosage 20mg
https://tadalaccess.com/# cialis discount coupons
online cialis TadalAccess cialis tadalafil discount
cialis what is it: is tadalafil and cialis the same thing? – ordering tadalafil online
buy cialis usa: buy cialis united states – cialis buy australia online
https://tadalaccess.com/# buy tadalafil online canada
cialis online overnight shipping cialis generic best price prices cialis
cialis 20 mg price costco: cialis directions – sublingual cialis
cialis price costco: cialis pill canada – cialis free samples
https://tadalaccess.com/# cialis 40 mg reviews
k4xhei
pastilla cialis: purchase brand cialis – generic tadalafil tablet or pill photo or shape
cialis bestellen deutschland cialis from canada does cialis raise blood pressure
cialis one a day: TadalAccess – where to buy cialis over the counter
https://tadalaccess.com/# cialis for daily use
cialis vs.levitra: cialis vs flomax – cialis over the counter usa
cialis none prescription e20 pill cialis what is cialis taken for
canadian pharmacy cialis 40 mg: TadalAccess – uses for cialis
https://tadalaccess.com/# cialis experience
buy cialis in canada: cialis testimonials – canadian pharmacy ezzz cialis
https://tadalaccess.com/# cialis for bph insurance coverage
cialis mechanism of action cialis 80 mg dosage tadalafil generic usa
buy cialis tadalafil: cialis cheap – cialis where to buy in las vegas nv
buying cialis without a prescription: TadalAccess – taking cialis
https://tadalaccess.com/# what does generic cialis look like
cheapest 10mg cialis when does tadalafil go generic cialis 20mg price
cialis from india online pharmacy: cialis generic name – cialis price
uses for cialis: Tadal Access – when will generic tadalafil be available
https://tadalaccess.com/# cialis price south africa
cialis 5mg price comparison snorting cialis cialis side effects
cialis canada pharmacy no prescription required: TadalAccess – tadalafil tablets erectafil 20
cialis pill: tadalafil buy online canada – cialis canada price
https://tadalaccess.com/# cialis for prostate
cialis coupon rite aid cialis otc switch cialis dopoxetine
walgreen cialis price: cialis professional 20 lowest price – cialis not working anymore
cialis ontario no prescription: Tadal Access – cialis 5mg coupon
9e505w
https://tadalaccess.com/# prices cialis
cialis before and after pictures Tadal Access cialis effectiveness
cialis online overnight shipping: canada pharmacy cialis – difference between tadalafil and sildenafil
cialis ingredients: Tadal Access – difference between tadalafil and sildenafil
https://tadalaccess.com/# cialis dosis
cialis online aust can you drink alcohol with cialis cialis free trial canada
cialis canadian pharmacy: cialis what age – cialis payment with paypal
ordering cialis online: TadalAccess – tadalafil generic reviews
https://tadalaccess.com/# recreational cialis
cialis store in philippines: cialis insurance coverage – cialis canada
buy liquid cialis online TadalAccess generic tadalafil 40 mg
cialis no prescription overnight delivery: Tadal Access – cialis experience forum
https://tadalaccess.com/# buy cialis online overnight delivery
Мураками – Немного счастья (Новогодняя) скачать песню и слушать онлайн https://shorturl.fm/HpHBU
Silver Nail,Aruba Ice,Syntheticsax – Прекрасное далеко (Radio edit) скачать песню и слушать бесплатно https://shorturl.fm/U6UJ8
Чи-Ли – Можно всё! (DJ Kirill Clash Radio Remix) скачать песню в mp3 и слушать онлайн https://shorturl.fm/tdBAn
Дюна – На Бали скачать mp3 и слушать онлайн бесплатно https://shorturl.fm/y2m1q
Nikky Rocket – Дым скачать mp3 и слушать онлайн бесплатно https://shorturl.fm/YHv91
Баста & Zivert – Неболей (Denis First Remix) скачать и слушать песню https://shorturl.fm/YOvyp
Кирилл Скрипник – Где Ты скачать mp3 и слушать онлайн бесплатно https://shorturl.fm/HIoNN
cialis before and after photos: cialis bodybuilding – cialis black 800 mg pill house
cialis premature ejaculation: cialis from india online pharmacy – cialis timing
cialis pill tadalafil citrate bodybuilding cialis discount card
https://tadalaccess.com/# cialis for sale
cialis package insert: TadalAccess – cialis 10mg ireland
cialis 20 mg best price: cialis generic online – cialis 5mg daily
cialis what is it TadalAccess uses for cialis
https://tadalaccess.com/# purchasing cialis
printable cialis coupon: cialis none prescription – why is cialis so expensive
cialis bathtub: TadalAccess – buy cialis overnight shipping
mambo 36 tadalafil 20 mg Tadal Access generic tadalafil 40 mg
https://tadalaccess.com/# does cialis shrink the prostate
cialis going generic: tadalafil tablets – cialis dapoxetine
is generic cialis available in canada: Tadal Access – cialis logo
https://tadalaccess.com/# cialis daily vs regular cialis
cialis 5 mg TadalAccess purchase cialis on line
vardenafil and tadalafil: cialis professional – cialis 20 mg tablets and prices
https://tadalaccess.com/# cialis directions
cialis tadalafil 20mg kaufen: Tadal Access – cialis 10 mg
generic cialis 20 mg from india Tadal Access cialis images
cialis milligrams: can i take two 5mg cialis at once – overnight cialis delivery
https://tadalaccess.com/# best price on cialis
buy cheap cialis online with mastercard: TadalAccess – buy voucher for cialis daily online
cialis free trial coupon TadalAccess buying cialis online safely
cialis from canada to usa: cialis 20mg for sale – prescription free cialis
https://tadalaccess.com/# cialis bestellen deutschland
buy cialis generic online: TadalAccess – cialis dose
bph treatment cialis cheaper alternative to cialis buy cialis online in austalia
cialis by mail: TadalAccess – cialis 5 mg for sale
https://tadalaccess.com/# cialis online paypal
cialis professional review: vidalista 20 tadalafil tablets – benefits of tadalafil over sidenafil
cialis vs tadalafil: TadalAccess – cialis a domicilio new jersey
who makes cialis TadalAccess overnight cialis delivery usa
https://tadalaccess.com/# buy cialis online canada
cialis leg pain: cialis for daily use side effects – tadalafil oral jelly
online cialis prescription: buy cialis tadalafil – cialis coupon 2019
tadalafil with latairis cialis logo buy cialis canadian
online cialis no prescription: Tadal Access – cialis canadian pharmacy ezzz
https://tadalaccess.com/# canadian pharmacy online cialis
http://wish-club.ru/forums/index.php?autocom=gallery&req=si&img=5330
http://toyota-porte.ru/forums/index.php?autocom=gallery&req=si&img=3301
tadalafil vs cialis TadalAccess online cialis
http://terios2.ru/forums/index.php?autocom=gallery&req=si&img=4685
http://toyota-porte.ru/forums/index.php?autocom=gallery&req=si&img=3327
https://hrv-club.ru/forums/index.php?autocom=gallery&req=si&img=7042
best place to buy liquid tadalafil: TadalAccess – order generic cialis online
https://mazda-demio.ru/forums/index.php?autocom=gallery&req=si&img=6566
cialis 20 mg coupon: cialis sell – what does cialis do
http://toyota-porte.ru/forums/index.php?autocom=gallery&req=si&img=3371
https://mazda-demio.ru/forums/index.php?autocom=gallery&req=si&img=6585
when should you take cialis TadalAccess cialis and nitrates
https://tadalaccess.com/# cialis free 30 day trial
https://mazda-demio.ru/forums/index.php?autocom=gallery&req=si&img=6365
printable cialis coupon: Tadal Access – difference between sildenafil and tadalafil
cialis soft cialis copay card canadian pharmacy cialis brand
https://tadalaccess.com/# cialis patent expiration
tadalafil and ambrisentan newjm 2015: buy cialis in toronto – shop for cialis
e20 pill cialis Tadal Access how many mg of cialis should i take
cialis one a day with dapoxetine canada: when does tadalafil go generic – cialis online paypal
https://tadalaccess.com/# cialis 20 mg duration
buy tadalafil cheap online Tadal Access para que sirve las tabletas cialis tadalafil de 5mg
why does tadalafil say do not cut pile: TadalAccess – cialis otc switch
https://tadalaccess.com/# buy tadalafil powder
is tadalafil from india safe TadalAccess sunrise remedies tadalafil
cialis 20 mg coupon: take cialis the correct way – cialis once a day
https://tadalaccess.com/# how to buy cialis
what is cialis used to treat TadalAccess tadalafil lowest price
cialis amazon: TadalAccess – cialis india
how to get cialis without doctor: cialis or levitra – cialis tadalafil 20mg kaufen
cialis 20 mg best price Tadal Access where to get the best price on cialis
cialis price comparison no prescription: Tadal Access – where to buy cialis cheap
what does cialis look like purchase cialis online does tadalafil work
https://tadalaccess.com/# oryginal cialis
buy liquid tadalafil online: compounded tadalafil troche life span – generic tadalafil in us
cialis overnight shipping TadalAccess how much does cialis cost with insurance
price of cialis: TadalAccess – sildenafil vs cialis
https://tadalaccess.com/# buying cialis in canada
cialis how long does it last Tadal Access cialis same as tadalafil
what is cialis good for: adcirca tadalafil – black cialis
Medications online Australia: online pharmacy australia – Medications online Australia
low cost ed meds: affordable ed medication – Ero Pharm Fast
https://biotpharm.shop/# buy antibiotics
buy antibiotics for uti BiotPharm get antibiotics quickly
Сториз – Не Буду Алкоголь скачать бесплатно и слушать онлайн https://shorturl.fm/rPJli
3 – ий Январь – Ромашки скачать песню бесплатно в mp3 и слушать онлайн https://shorturl.fm/ojMRn
Storm DJs feat. Margerie – Весь Мир Против Нас скачать и слушать онлайн https://shorturl.fm/3TZSc
Кахун Токбаев – Чёрная Мамба скачать песню бесплатно в mp3 и слушать онлайн https://shorturl.fm/5UIBn
ВИА «Садо» – Во Имя Любви скачать и слушать песню https://shorturl.fm/1Lz5Z
Bodiev – Миллион скачать и слушать mp3 https://shorturl.fm/ejMrN
PharmAu24: Licensed online pharmacy AU – Pharm Au24
Over the counter antibiotics pills: buy antibiotics online uk – buy antibiotics from canada
online erectile dysfunction: online ed drugs – Ero Pharm Fast
low cost ed meds online Ero Pharm Fast Ero Pharm Fast
http://biotpharm.com/# get antibiotics quickly
erectile dysfunction medicine online: Ero Pharm Fast – buy erectile dysfunction medication
buy antibiotics from canada: Biot Pharm – antibiotic without presription
over the counter antibiotics: Biot Pharm – Over the counter antibiotics pills
buy antibiotics from canada: get antibiotics quickly – buy antibiotics online
ed drugs online order ed pills online erectile dysfunction pills for sale
online pharmacy australia: pharmacy online australia – Pharm Au24
buy antibiotics from india: Biot Pharm – buy antibiotics from india
Over the counter antibiotics for infection: buy antibiotics online uk – buy antibiotics
how to get ed meds online Ero Pharm Fast discount ed pills
Ero Pharm Fast: Ero Pharm Fast – ed treatment online
get antibiotics without seeing a doctor: buy antibiotics from india – get antibiotics without seeing a doctor
Ангелина Сергеева – Руку Дай Мне скачать mp3 и слушать онлайн https://shorturl.fm/j78eE
Pavel Panfilov – И Пускай Опять скачать песню бесплатно в mp3 и слушать онлайн https://shorturl.fm/FrYYe
Liranov – Разговор Наедине скачать mp3 и слушать онлайн https://shorturl.fm/CfmTn
Бесплатный Автобус – Столько Лет скачать песню и слушать онлайн https://shorturl.fm/hlpBc
Алена Росс – Прости, Малыш, Я Больше Не Твоя скачать mp3 и слушать онлайн https://shorturl.fm/9sTdT
Дейзи feat. XTM Prod – Золотой Граммофон скачать песню на телефон и слушать бесплатно https://shorturl.fm/w1qpE
Андрей Лебедев – Слайд скачать и слушать песню бесплатно https://shorturl.fm/KtEKu
Hey there! I know this is kind of off topic but I was wondering which blog platform are you using for this website? I’m getting tired of WordPress because I’ve had problems with hackers and I’m looking at options for another platform. I would be great if you could point me in the direction of a good platform.
https://www.droversointeru.com
Tolika – У Неё Всё Отлично скачать и слушать mp3 https://shorturl.fm/3w0mR
how to get provigil without a prescription buy modafinil 200mg for sale purchase modafinil generic where to buy provigil without a prescription provigil 100mg cost provigil 100mg oral order modafinil 100mg pill
Wow, marvelous weblog layout! How long have you ever
been running a blog for? you made blogging look easy. The overall look of your website is
fantastic, let alone the content!
I think other web-site proprietors should take this web site as an model, very clean and magnificent user genial style and design, let alone the content. You’re an expert in this topic!
http://www.tlovertonet.com/