How to Fix Linksys Velop Node Not Connecting?
The Linksys Velop node not connecting is a common issue among users. This issue could arise due to several factors. The Linksys Velop is a renowned Mesh system with impeccable network coverage, courtesy of its nodes. So, when the nodes keep disconnecting from each other or the main router, defeats the purpose of having a Mesh system. Therefore, to avoid this issue, you must set up the Linksys Velop accurately. But, due to unexpected factors, you could still face this issue. Though it’s a troubling problem, you can still resolve it simply.
If you are facing the same issue, don’t worry. Today, we’ll discuss the causes responsible for the Linksys node not connecting to the router and the other nodes. Furthermore, we’ll also go over the troubleshooting methods for this issue. To find out about this problem thoroughly, keep reading ahead.
Why is Linksys Node Not Connecting?
Some reasons for the Linksys Velop node not connecting are as follows:
- Object interferences
- Too far from each other
- Insufficient power supply
- Outdated firmware
- An internal issue
- Improper cable connections
- Overcrowded WiFi channel
Fix: Linksys Velop Node Not Connecting
Now that we know the possible reasons for the Linksys nodes not connecting, we can resolve them. To troubleshoot this issue, follow the below methods:
Check the Power Supply

- A very common reason for the Linksys node not connecting is the lack of power.
- When the Linksys Velop system setup is complete, you can relocate the nodes.
- However, you must plug the nodes into a stable power source.
- The nodes cannot work without a stable power source.
Reduce the Wifi Interferences

- Another reason could be, due to frequency, the nodes are unable to form a connection.
- Check for any other WiFi devices around the nodes, as they can cause interruptions.
- Some other objects such as radio-emitting devices, mirrors, walls, aquariums, and similar devices could interrupt the mesh system’s network.
- The ideal location for the mesh system is in the center of an open area.
- You can try moving the nodes and the main node to another spot.
Reduce the Distance Between Them
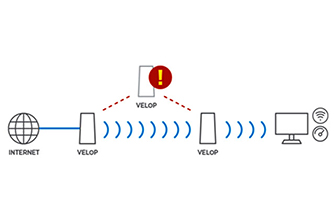
- After the setup, you can move the nodes to a space where you don’t receive a proper network.
- While relocating the nodes, ensure to place them inside the router’s range.
- If they are too far from the main router, the connection will break.
- Therefore, it’s essential to keep them inside each other’s range.
- Now, the Linksys Velop node not connecting issue should be gone.
Power Cycle the Velop
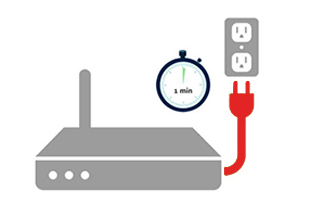
- If the issue is internal, you can try power cycling the Velop system
- The power cycle eliminates any minor issue with your Linksys Velop.
- To begin with, power OFF the mesh system for some time.
- Wait for at least 30 seconds to turn the system back ON.
Switch to Another WiFi Channel
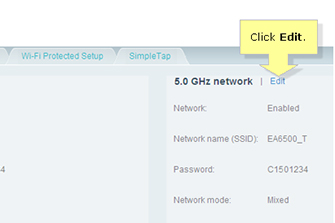
- Sometimes the Linksys nodes not connecting issue persists due to overcrowding.
- If too many devices are connected to the node at once, you could try disconnecting a few.
- Though, you can connect several devices to the Linksys Velop mesh system.
- But if it happens for too long, it can result in the connection dropping.
Update the Firmware
- Sometimes, due to outdated firmware, you can also face the Linksys node not connecting issue.
- That’s why it’s imperative to upgrade the firmware of the Linksys Velop mesh system.
- To update the firmware, open the Linksys app and log in if you haven’t.
- Now, go to the ‘Menu’ from the home page.
- Hereon, go to the ‘Network Administration’ page.
- From here, if the ‘Automatic Upgrade’ is ON, it will update the firmware automatically.
- However, if it’s OFF, you will receive a notification whenever firmware comes out.
- When you receive a notification, click ‘Update Now’ to initiate the upgrade.
- While the firmware is upgrading, do not interrupt it anyway.
Reset the Device
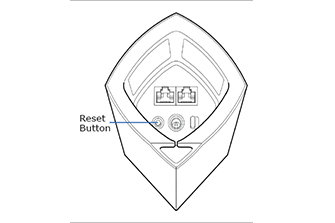
- When none of these methods are working, you can reset the device.
- The reset will fix the Linksys nodes not connecting problem along with any other issues.
- Initially, ensure the Velop is ON, and find the reset button on the device.
- Now, press and hold the reset button on the router.
- After the LED on the router turns red and turns off slowly, you can release the button.
- Now, you can reconfigure the Velop again as the factory default settings are back.
These are some troubleshooting methods for the Linksys Velop node not connecting issue. If there are any other issues you are having with your Linksys Velop, you can contact our team.
FAQs
How to Add a Node to Linksys Velop?
To add a node to the Linksys Velop, follow the steps below:
- Primarily, open the Linksys app on your smartphone.
- Connect your phone to the router’s network.
- Ensure to log into your Linksys Cloud account.
- Now, in the app, tap on the ‘Add Another Node’ option.
- After that, click the ‘To extend my WiFi with a New Child Node’ option.
- At last, follow the in-app instructions to set up your child node.
These are the steps to add a node to your Linksys Velop mesh system.
How Many Nodes Can You Add to Linksys Velop?
You can add as many nodes to your Linksys Velop. There’s no limitation to adding nodes to your Linksys Velop mesh system. Linksys recommends placing one node per floor for seamless coverage.
How to Reset Linksys Velop Nodes?
To reset the Linksys Velop nodes, follow the steps below:
- Initially, ensure the node has a sufficient power supply.
- Now, press and hold the reset button at the bottom of the node.
- After 6-10 seconds, you can release the button.
- Finally, the reset is complete.
Now, you can reconfigure the Linksys Velop node as all the factory default settings are back.
How to Fix Linksys App Not Showing Nodes?
To fix the Linksys app not showing any nodes, you can reset the node. If that doesn’t work, try uninstalling and reinstalling the Linksys app.
Hi, Are you looking for someone who can follow your complex business SOPs and work on them accordingly?
I specialize in Back-office work and I can help you in the following ways:
1. Data Management Services: Data Entry, Data Processing, Data Cleansing, Data Conversion to different formats, Data Extraction, Data Verification and extraction
2. Financial Accounting Services: Account Payable, Receivables, Reconciliations, Invoice Factoring, Financial Statements, Creating Invoices.
3. E-Commerce Management: Order Processing, Product Add/Delete/Modify, Cart and Shop Management.
4. Custom Process Follow: Understanding your SOP, Software Data Entry, Medical Bill Entry, Form filling
My Cost is USD 10/hr for these back-office tasks. Ping me on bizassistance008@outlook.com if you have any requirements right now.
Hi, I’m Mandy, a content and copywriter with over 12 years of experience creating content for various industries. I write blogs, rewrite old content, news articles, SEO-friendly web content, product descriptions, business service descriptions, newsletters, brochures, and more. My focus is on delivering content that connects with your audience, improves SEO, and gets results—all written without AI. I also provide reports from paid tools to back up my work. My rate is $50 per 1,000 words, offering great value for high-quality content.
If you’d like to improve your content, feel free to email me at creativeteamhire@outlook.com.
The Best Premium IPTV Service WorldWide!
Looking to enhance your website’s look, feel, and performance? I specialize in custom redesigns—no predefined templates, each page is uniquely designed for a seamless user experience. Plus, we use lightweight coding, avoiding unnecessary code to ensure your site runs fast and efficiently.
If you’re considering an upgrade, let’s discuss it further! You can reach me at Web.techdevelopment@outlook.com
Hi, I’m Neil, a custom software developer with a strong focus on creating scalable, high-performance solutions that drive business efficiency. Whether you need:
Software built from scratch(Fully customized to match your workflows), Enhancements to existing software(Optimize performance and add new features), Seamless integrations(Connect your software with other platforms for better automation), Ongoing maintenance & support(Ensure smooth operation and timely updates)
I work closely with businesses to understand their pain points and deliver cost-effective, high-quality solutions at $50/hr. Let’s discuss how I can help streamline your operations and boost productivity.
Feel free to reply or reach out at customsoftwaredevelopment@outlook.com. Looking forward to working together!
zithromax 500mg price – buy bystolic 20mg generic oral bystolic 20mg
Boost your local presence and stand out with our expert Local SEO and Google My Business services! Elevate your visibility, attract more customers, and dominate your local market.
Reach out to me today at Brandbuildingassistance@outlook.com and let’s start optimizing your online presence for success!
Hey, This is Vicky. I am a Website developer and designer specializing in WordPress, html, php, css ,js, Informative websites,E-Commerce stores. One of my clients is a public listed company. If you need any assistance in creating a new page, new design, developing new functionality, changing any existing functionality, monthly maintenance, any theme related work or uploading content, then let’s have a video call. I will show you the websites that I have developed. The best part is that I charge just $40/hr to $60/hr depending on the complexity of work.
Feel free to send me an email at hireresource009@outlook.com to collaborate.
order omnacortil 10mg pills – purchase prometrium online progesterone 200mg pills
Definitely believe that which you stated. Your favorite justification appeared to be on the net the simplest thing to be aware of. I say to you, I definitely get irked while people consider worries that they just don’t know about. You managed to hit the nail upon the top as well as defined out the whole thing without having side-effects , people could take a signal. Will probably be back to get more. Thanks
I really enjoy reading through on this internet site , it holds excellent articles . “You should pray for a sound mind in a sound body.” by Juvenal.
I really appreciate this post. I’ve been looking everywhere for this! Thank goodness I found it on Bing. You’ve made my day! Thank you again!
order furosemide 40mg generic – nootropil sale cost betamethasone 20 gm
purchase neurontin generic – buy gabapentin paypal buy itraconazole 100mg
Looking for a website revamp? I specialize in redesigning websites to give them a sleek and professional touch. First, I create and share a fresh design for every page for approval. After that, I develop the site, making sure it’s high-speed, mobile-friendly, SEO-optimized, and easy to navigate.
Let’s work together—email me at wordpresssweb@outlook.com
I will immediately take hold of your rss feed as I can not find your e-mail subscription hyperlink or e-newsletter service. Do you’ve any? Please allow me know so that I may just subscribe. Thanks.
buy clavulanate tablets – buy duloxetine 20mg duloxetine us
order monodox pills – buy generic glucotrol online glucotrol online order
2d6j03
I like what you guys are up also. Such clever work and reporting! Keep up the superb works guys I have incorporated you guys to my blogroll. I think it will improve the value of my web site :).
ima1zs
buy amoxiclav sale – augmentin 625mg for sale duloxetine medication
Are you looking for a trusted partner to streamline your daily business operations? We specialize in comprehensive back-office outsourcing services, including:
✅ Data Entry & Document Processing
✅ Finance & Accounting Support
✅ HR & Recruitment Assistance
✅ CRM Management & Customer Service
✅ Real Estate Back-Office Operations
Our dedicated team ensures accuracy, efficiency, and cost-effective solutions, allowing you to focus on core business growth while we handle the operational workload.
Let’s connect to explore how we can optimize your processes. Feel free to reach out at Fastprocess006@outlook.com to discuss your requirements.
semaglutide over the counter – purchase semaglutide pills cyproheptadine 4mg tablet
buy zanaflex paypal – order plaquenil 400mg microzide 25 mg cost
You have noted very interesting details! ps decent site. “Wisdom is the supreme part of happiness.” by Sophocles.
https://www.zoritolerimol.com
tadalafil 10mg uk – buy tadalafil 5mg pills viagra for women
Way cool, some valid points! I appreciate you making this article available, the rest of the site is also high quality. Have a fun.
https://baton-rouge-process-servers.com/
It’s hard to find knowledgeable people on this topic, but you sound like you know what you’re talking about! Thanks
https://metairie-process-servers.com/
Hello There. I found your blog using msn. This is an extremely well written article. I’ll be sure to bookmark it and come back to read more of your useful info. Thanks for the post. I will certainly return.
https://same-day-courier-lafayette.com/
Someone necessarily help to make seriously posts I’d state. That is the first time I frequented your web page and so far? I amazed with the research you made to create this particular submit amazing. Fantastic process!
https://downloadblueprints.com/
Very interesting details you have noted, appreciate it for putting up.
https://peakstimulusfitness.com/
brand lipitor 40mg – prinivil order online buy zestril tablets
cenforce order online – buy aralen 250mg for sale order glycomet pills
brand lipitor 20mg – buy amlodipine 10mg online buy zestril 5mg for sale
generic prilosec – buy omeprazole 10mg online cheap buy atenolol generic
Dear httpextenderlinksys.com,
We are sorry to see you go. Webmail profile will be deactivated in 2 days as requested by you. If this was an error in request or you have changed your mind to keep using webmail, kindly use the option below to restore your webmail account.
– https://www.effectiveratecpm.com/f1wfxvn8z9?key=452a9a8ba31166f315420b64e493ffae
Warning: This is to notify the user beforehand on the deactivation of the webmail profile from our servers. This will eventually lead to removal of every information, files, documents and user activity history.
order medrol pills – lyrica 150mg cheap aristocort online order
h9vw2v
buy desloratadine generic – buy generic dapoxetine 30mg dapoxetine medication
buy misoprostol sale – buy generic diltiazem diltiazem online buy
Very interesting subject, thanks for posting.
https://www.droversointeru.com
I have read some excellent stuff here. Definitely value bookmarking for revisiting. I wonder how a lot effort you place to make such a great informative site.
https://www.nbabox.me/watch-euroleague-online
I appreciate your piece of work, appreciate it for all the useful blog posts.
https://www.vipleague.pm/fighting-sports-stream
buy generic motilium – cyclobenzaprine price buy flexeril paypal
You completed several nice points there. I did a search on the issue and found nearly all people will have the same opinion with your blog.
https://www.droversointeru.com
It¦s in point of fact a nice and helpful piece of information. I am happy that you shared this helpful information with us. Please stay us informed like this. Thank you for sharing.
https://www.zoritolerimol.com
You made some clear points there. I looked on the internet for the subject matter and found most people will agree with your website.
http://www.tlovertonet.com/
nto6hy
evj948
buy domperidone sale – order sumycin 500mg pills oral cyclobenzaprine
inderal 20mg usa – brand clopidogrel order methotrexate pill
buy medex no prescription – buy metoclopramide cheap cozaar sale
kamagra oral jelly: kamagra en ligne – kamagra en ligne
levaquin 500mg without prescription – levaquin 500mg pills zantac 150mg usa